Essential Gear for Your Home Live Chat Workspace
Starting a live chat from home can be tough if you don’t have the right gear. In 2021, more than half of all video content was viewed on mobile, making quality streaming more important than ever.
This article will guide you through picking equipment that’ll make your home live chats clear and professional. Ready to transform your space into a broadcast studio? Keep reading!
Key Takeaways
- High-definition cameras improve your live chat visual quality, with features like autofocus and low-light performance being beneficial for professional streams.
- Clear audio is vital; a good microphone that filters background noise helps maintain viewer engagement during live chats.
- Good lighting, such as ring lights or softbox lights, reduces shadows and enhances facial features for a better viewing experience.
- Video switchers and encoders are key for smooth transitions between shots and high – quality streaming to various online platforms.
- Accessories like tripods stabilize the camera angle, an audio mixer ensures sound level balance, graphics enhance the visual appeal, and a reliable high-speed internet connection is essential for uninterrupted streaming.
Key Components for a Live Chat Setup
When setting up a live chat at home, it’s important to have the right equipment like a high-quality camera, microphone, lighting, video switcher, and encoders to ensure a smooth and professional broadcast.
Each component plays a crucial role in creating an engaging and visually appealing live chat experience for your audience.
Camera
Choosing the right camera is crucial for your home live chat setup. It’s the eye of your audience into your world, so a high-quality video camera can make all the difference. Look for one that captures clear, crisp images and has good low-light performance if you’ll be streaming in varied lighting conditions.
Many cameras now offer HD or even 4K resolution which ensures that every detail is sharp.
Consider a webcam with built-in autofocus and light correction features for ease of use. This will help keep you looking professional without constant manual adjustments during your live stream.
Also, some models come with software enhancements that smooth out skin tones and optimize color balance. These smart home devices serve as an effortless way to elevate the quality of video conferencing from your home office, ensuring communication tools are at their best during remote work setups.
Microphone
Your microphone is a crucial tool for ensuring your voice comes through clearly and without any distracting noises during live chats. You’ll want to look for a mic that can filter out background sounds and hone in on your voice, whether you’re talking softly or excitedly.
A variety of microphones are available, from USB models that are easy to plug in and use to high-end condenser mics that capture studio-quality audio.
Consider the space where you’ll be streaming when selecting your microphone. If it’s an area with lots of echo, a dynamic microphone might be best as they’re less sensitive to ambient noise.
Mounting options matter too; ensure you have a stable stand or boom arm to prevent the mic from picking up vibrations off your desk. Good sound quality will keep viewers engaged and make your live chat setup feel more professional.
Lighting
Good lighting can make or break your live chat setup. It’s not just about making sure your face is visible; the right light quality can boost viewers’ experience and keep them engaged.
Consider investing in a ring light that diffuses soft light evenly, reducing shadows and highlighting your features without glare. For larger spaces, softbox lights provide a professional look by creating a natural ambiance.
Positioning matters too—place lights in front of you to illuminate your face properly without backlighting that creates silhouettes. Play with angles to find the most flattering setup and adjust intensity based on the time of day or room conditions.
With proper lighting, you’ll appear clear and professional on camera, which builds trust with your audience. Once you’ve got lighting sorted out, it’s time to move onto enhancing visual elements using tools like video switchers and encoders.
Video Switcher
The video switcher is a crucial component of any live chat setup, allowing seamless transitions between multiple camera angles or visual sources. It enables you to create professional-looking broadcasts by smoothly switching between different shots and incorporating various visual elements into your live stream.
With the ability to enhance the production value of your content, a video switcher empowers you to engage your audience more effectively and maintain their interest throughout the broadcast.
When it comes to selecting a video switcher for your home live chat setup, consider factors such as the number of inputs needed, support for different resolutions, and ease of use.
Encoders
After setting up your video switcher, the next essential component for your home live chat setup is an encoder. Encoders convert the audio and video signal from your camera and microphone into a digital format suitable for streaming over the internet.
Whether hardware-based or software-based, encoders play a crucial role in delivering high-quality live content to your audience. With various options available on the market, ensure that you choose an encoder that aligns with your streaming needs and technical capabilities.
For smooth live chat broadcasts, consider factors such as compatibility with your chosen streaming platform, ease of configuration, and support for different input sources when selecting an encoder.

Equipment Setups for Different Budgets
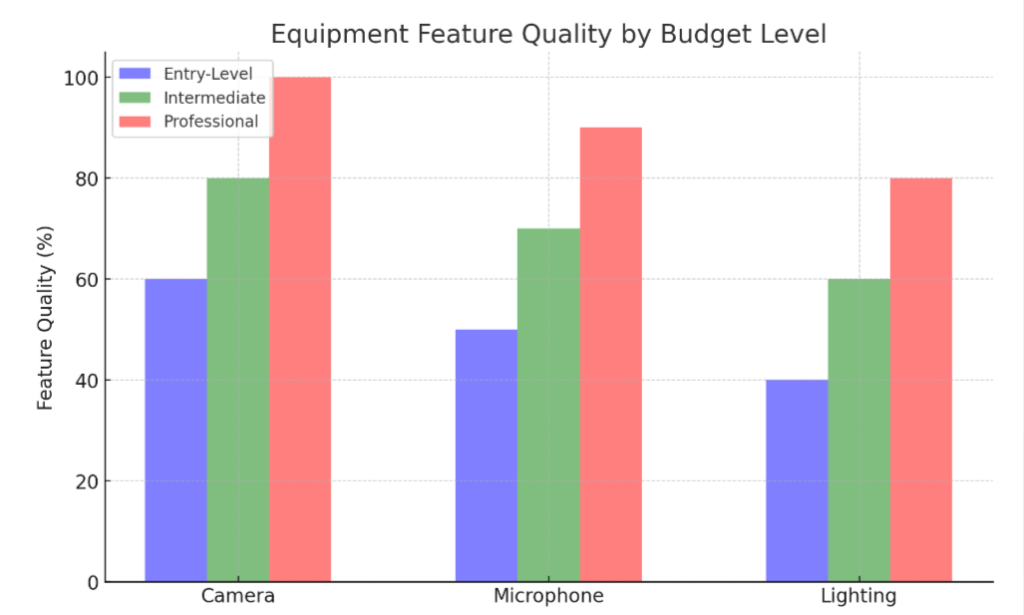
If you’re on a tight budget, an entry-level setup with basic equipment like a webcam and simple microphone can get you started. For those with a bit more to spend, an intermediate setup with higher quality camera, microphone and lighting may be the way to go.
And for professionals looking for top-notch quality and advanced features, investing in high-end video switchers, encoders and professional-grade microphones might be the best option.
Entry Level Setup
An entry-level setup for your home live chat includes the essential equipment to get you started. Here’s what you’ll need:
- Webcam: A good quality webcam capable of HD video will provide clear and sharp visuals for your broadcast.
- USB Microphone: An easy-to-use USB microphone will ensure clear and crisp audio for your live chat, without the need for additional mixing equipment.
- Basic Lighting Setup: Softbox lights can help illuminate your space evenly, reducing shadows and ensuring good visibility on camera.
- Simple Video Switcher: A basic video switcher with a few input ports can allow you to switch between different sources such as your camera feed and screen sharing during the live chat.
- Entry-Level Encoder: A simple encoder will help compress and convert the audiovisual data from your setup into a format suitable for streaming over the internet.
- Stable Internet Connection: Ensure you have a reliable high-speed internet connection to support smooth streaming without interruptions.
- Tripod Stand: A sturdy tripod stand for your webcam will provide stability and enable you to adjust the angle as needed during the live chat broadcast.
- Graphics/Text Overlay Software: Using software that allows you to overlay graphics or text onto your live stream can enhance the visual appeal of your broadcasts.
Intermediate Setup
When setting up an intermediate live chat equipment, consider the following key components and necessary accessories:
- Camera: Invest in a high-definition video camera with good low-light performance for clear and professional-looking video.
- Microphone: A high-quality condenser microphone with a USB interface will ensure crisp and clear audio for your live chat broadcast.
- Lighting: Use softbox or LED lighting to create a well-lit and flattering environment for your live chat setup, reducing harsh shadows and improving overall video quality.
- Video Switcher: Consider using a video switcher to manage multiple camera angles, graphics, and transitions seamlessly during your live broadcast.
- Encoders: Look for a reliable hardware or software encoder that can efficiently convert your audiovisual feed into streaming formats compatible with popular platforms.
- Necessary Accessories:
- Tripods: Sturdy tripods to mount your camera and lighting equipment securely.
- Audio Mixer: A compact mixer to control audio inputs from multiple sources.
- Graphics/Text Overlay: Software or hardware to add branding elements or overlay text during the broadcast.
- High-speed Internet Connection: Ensure a stable internet connection with sufficient bandwidth for uninterrupted streaming.
Professional Setup
For a professional setup, consider the following key components:
- Invest in a high-quality 4K video camera with advanced features such as auto-focusing, manual exposure control, and low-light performance to ensure clear and professional-looking video content.
- Select a premium studio – grade microphone with superior sound quality, noise cancellation, and adjustable pickup patterns to capture crisp and clear audio during live chats.
- Utilize professional lighting fixtures with adjustable color temperature, brightness controls, and diffusion options to create a well-lit and visually appealing setting for your live chat broadcasts.
- Incorporate a video switcher that allows seamless switching between multiple camera feeds, picture-in-picture effects, and customizable transitions for a more engaging live chat experience.
- Opt for high – performance encoders equipped with advanced streaming capabilities, support for multiple streaming platforms, and robust connectivity options to ensure smooth and reliable live streaming.
Necessary Accessories for Live Chat
To complement your live chat setup, you’ll need essential accessories like tripods for stable camera positioning, an audio mixer for sound control, and graphics/text overlay for visual enhancements.
A high-speed internet connection is also crucial for a seamless live chat experience.
Tripods
Tripods provide stability for your camera during live chat sessions. Position the tripod at a suitable distance from your seating area, ensuring that it holds the camera securely in place.
Adjust the height and angle of the camera to capture clear visuals and maintain eye-level contact with viewers.
Consider investing in a tripod with adjustable legs and a smooth pan-and-tilt head for versatile positioning options. This allows you to easily adapt to different setups or angles while maintaining professional-looking video quality.
Audio Mixer
To ensure high-quality sound production in your live chat setup, consider incorporating an audio mixer. This device allows you to control and adjust the audio levels from different microphones or sources, combining them into a single output for crisp and professional sound quality.
By using an audio mixer, you can fine-tune the balance between speakers or panelists during your live chat sessions, enhancing the overall experience for your viewers.
For optimal functionality, familiarize yourself with the various features of an audio mixer. Utilize its capabilities to elevate the clarity and impact of your live chat broadcasts effectively.
Graphics/Text Overlay
To enhance your live chat broadcasts, add a professional touch with graphics and text overlay. Use software programs like OBS or XSplit to create dynamic visuals that display information such as names, logos, and messages on the screen.
Incorporate lower thirds to introduce guests or display topic titles, providing a polished look to your live chat setup.
For easy readability and engagement, choose clean fonts and contrasting colors for your text overlay. Avoid cluttering the screen – keep it simple yet captivating by strategically placing graphics and texts where they complement the content without being distracting.
High-speed Internet Connection
When setting up your home live chat equipment, a high-speed internet connection is crucial for seamless streaming. It ensures that your audience experiences smooth video and audio without buffering or lagging issues.
A reliable internet connection also contributes to better overall broadcast quality and viewer engagement.
To support the demands of live streaming, look for an internet service provider that offers high upload speeds as well as consistent bandwidth. This will help maintain a stable connection even during peak usage times.
Additionally, consider using a wired Ethernet connection instead of Wi-Fi for more reliability in transmitting data. Keeping these factors in mind while choosing your internet plan can significantly enhance the quality of your live chat broadcasts.
How to Set Up Live Chat Equipment
Once you have all the necessary equipment, it’s time to set up your home live chat setup. This involves connecting audio and video sources, configuring the encoder, testing your internet connection, and beginning the live chat broadcast.
Connecting Audio and Video Sources
To connect audio and video sources for your home live chat setup, follow these steps:
- Plug in your microphone to the audio mixer using the appropriate cable.
- Connect your camera to the video switcher using an HDMI cable.
- Ensure that the lighting system is positioned and turned on to provide adequate illumination for the video.
- Use an Ethernet cable or connect wirelessly to ensure a stable internet connection for streaming.
- Start up your encoder software and configure it to receive audio and video inputs from the connected sources.
- Double – check that all connections are secure and properly established before beginning your live chat broadcast.
Configuring the Encoder
After connecting your audio and video sources, the next step is to configure the encoder. Here are the steps to configure the encoder for your live chat setup:
- Access the encoder’s settings on your computer or control panel.
- Select the appropriate video and audio input sources for encoding.
- Adjust the bitrate and resolution settings based on your streaming platform’s recommended specifications.
- Enable any necessary features such as closed captioning or overlays.
- Test the encoder to ensure a stable connection to your streaming platform.
- Save and apply the configuration settings before proceeding with your live chat broadcast.
Connecting to a Streaming Platform
Once you have configured the encoder, the next step is to connect to a streaming platform. Here’s how you can do that:
- Log in to your chosen streaming platform using your account credentials.
- Access the broadcasting dashboard or settings section of the platform.
- Locate the option for adding an external video source or encoder.
- Enter the stream key provided by the platform into your encoder’s settings.
- Ensure that the output resolution and bitrate on the platform align with your encoder settings.
- Test the connection by initiating a short test broadcast on the streaming platform.
Testing Internet Connection
After connecting your live chat setup to a streaming platform, it’s important to test your internet connection before beginning the broadcast. Here are the steps to ensure a stable and reliable connection:
- Check Your Internet Speed: Use an online speed test tool to measure your upload speed, ensuring it meets the minimum requirements for live streaming.
- Wired Connection: If possible, connect your computer directly to the router using an Ethernet cable for a more stable connection compared to Wi-Fi.
- Bandwidth Allocation: Ensure that other devices on the network are not consuming excessive bandwidth during your live chat broadcast.
- Ping Test: Conduct a ping test to check for any latency issues that could affect the quality of your stream.
- Backup Plan: Have a backup internet connection ready in case of any unexpected disruptions during the live chat.
- Run Test Broadcasts: Before going live, conduct test streams at different times of the day to ensure consistent internet performance.
- Network Security: Make sure your network is secure from potential interference or unauthorized access during the live chat session.
Beginning the Live Chat Broadcast
To begin the live chat broadcast, make sure all your equipment is connected and powered on. Ensure that your camera is positioned correctly and that the lighting is adjusted for optimal visibility.
- Activate your microphone and ensure it’s properly positioned to capture clear audio.
- Configure your video switcher to display the desired sources and set up any graphics or text overlays.
- Adjust the audio mixer to ensure balanced sound levels for all input sources.
- Verify that your encoder is connected to the streaming platform and has been configured with the appropriate settings.
- Test your internet connection to ensure sufficient bandwidth for a smooth live chat broadcast.
- Once everything is set up, start the live chat broadcast and engage with your audience in real – time.
Conclusion
In conclusion, selecting the right equipment for your home live chat setup is crucial for a professional and engaging broadcast. Make sure to consider the quality of your camera, microphone, lighting, and other necessary accessories within your budget.
Setting up the equipment correctly will ensure a seamless live chat experience for you and your audience. Selecting appropriate gear tailored to your needs can ultimately enhance the overall quality of your live chat broadcasts.

